Making custom ground textures
Posted: Fri Jun 29, 2007 4:49 pm
SBuilder X will create custom ground directly from the background image. There are different methods:
1. A quick and simple method - SBuilder X will take the images in the present workspace and automatically convert them into a custom ground bgl.
The SBuilder X workspace is 1792 x 1280 pixels in size and that will be the extent of the custom ground, although the resolution will depend on the zoom level of the background.
SBuilder X will also apply a simple blend mask that will blend the custom ground into the default textures along a thin band on the edge of the image.
To create custom ground textures by this method, right-click on the SBuilder X workspace:
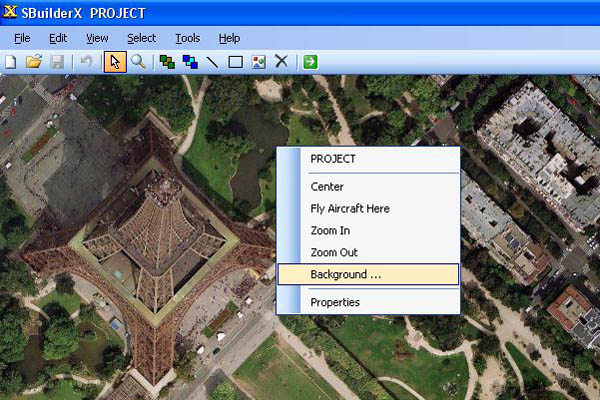
Select the "Background ..." option to get this window:
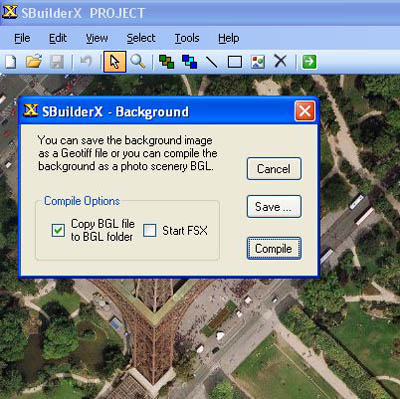
You will have 2 options: either immediately compile the custom ground from the workspace, or save that workspace as a GeoTIFF image file;
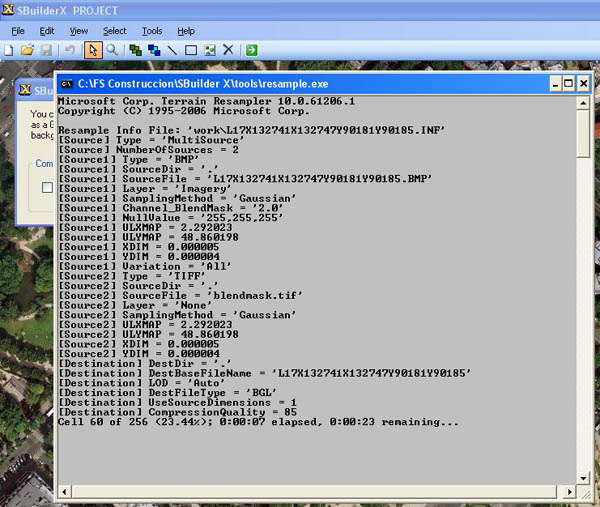
By selecting "Compile", SBuilder X will launch the Microsoft Resample program and create the custom ground bgl:
Once your custom ground file has been created, you can change the name of the bgl to something more descriptive.
2. The second method for creating custom ground textures - you can select the precise area for which you want custom ground, SBuilder X will make it into a Map (with its own calibration text file), and that Map can be selected and compiled into a bgl. The Map can also be edited to correct colors, add transparent areas, or as a basis for creating blend masks and water masks.
First, you should zoom out so that the entire area of your choice is visible in the SBuilder X workspace. Then, go to the File-Add Map-From Background:
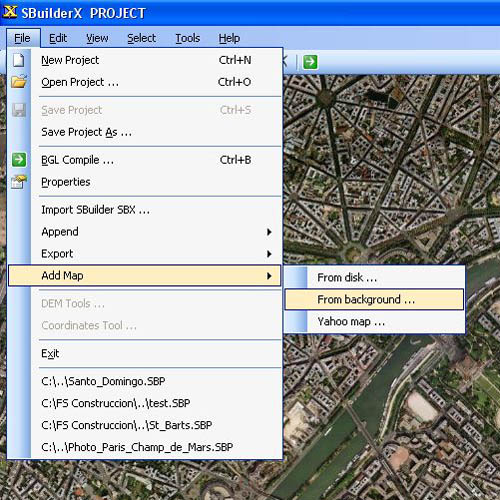
This will bring up a selection window:
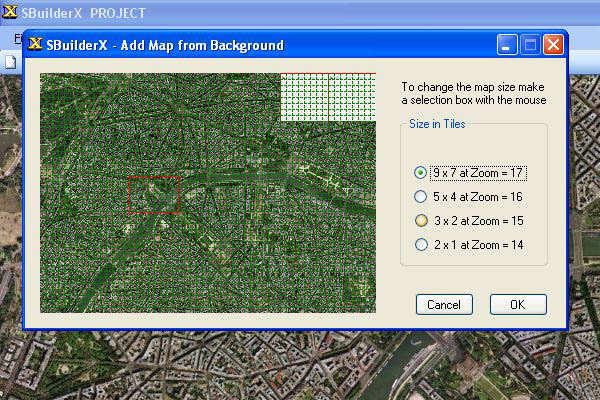
You can draw a selection rectangle directly over the image to select the area desired, and also choose the zoom level you want.
Once you have done so, Builder X will create a Map of this size and with this coverage, and display it in the workspace instead of the Background image.
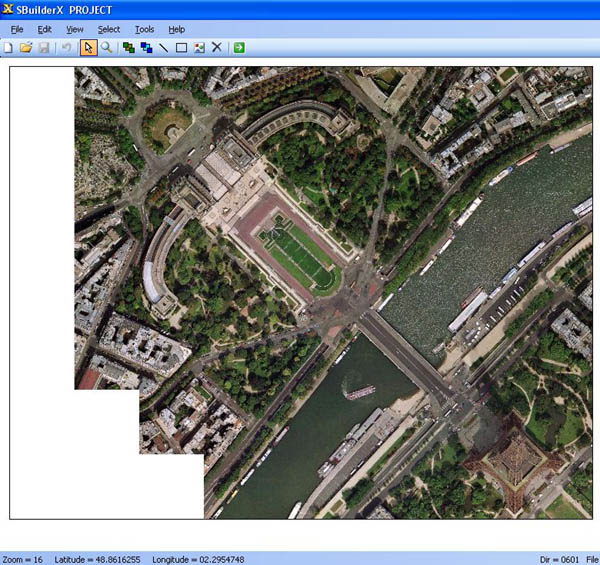
Any part of the selection for which there are no tiles will display in pure white (RGB values = 255,255,255) and will serve as a Null Value, that is, will be completely transparent and display the underlying terrain.
Be careful, as other parts of the image may also have pure white pixels, and they too would be completely transparent, so you may want to edit the Map in any image editing program first before compiling into custom ground.
If you right-click on the edge of the Map, you can bring up its Properties window:
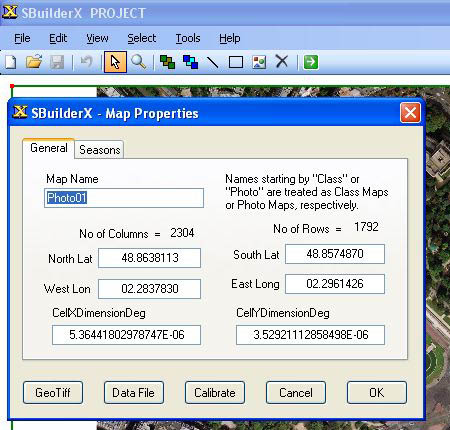
Note that SBuilder X will give the Map a name that begins with "Photo". This is the name that will be given to the final bgl. You can change the name of the Map to anything that you wish, but it must start with "Photo" so that SBuilder X can recognize it as a source for custom ground. Once the bgl has been created, you can change its name.
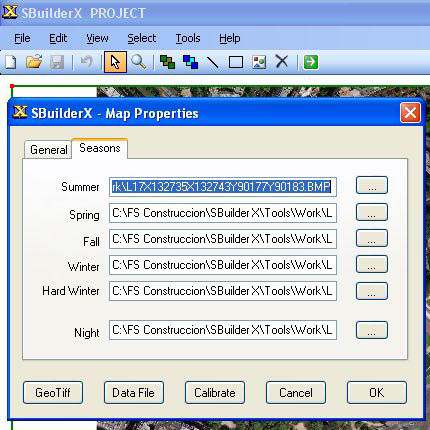
If you decide to use the Map to create seasonal or night variants of the image, you can indicate them in the second tab of the Map Properties window:
To add blend masks or water masks to your custom ground, you can create them using the original image as a basis, and then save them with the same name, but using a suffix to indicate this. The files should be saved as TIF images, for example:
original image - L17X132735X132743Y90177Y90183.BMP
blend mask - L17X132735X132743Y90177Y90183_B.TIF
water mask - L17X132735X132743Y90177Y90183_W.TIF
Make sure that those files are in the SBuilderX\Tools\Work folder even if the original image is in another folder, and SBuilder X will automatically integrate the blend and/or water mask in the custom ground.
A word about Compression Quality: FS X allows for varying the compression of the final bgl. It has been determined that reducing the Compression Quality parameter from 100 to 85 will greatly reduce the size of the final bgl (up to a quarter of the original size) as well as the time needed to compile it. You can change the Compression Quality in the SBuilder.ini configuration file.
To create the custom ground bgl, simply select the Map (either by clicking on its edge, or by using the Select menu) and click on the BGL Compile icon (the green arrow) on the tool bar, which will bring up the Compile window:
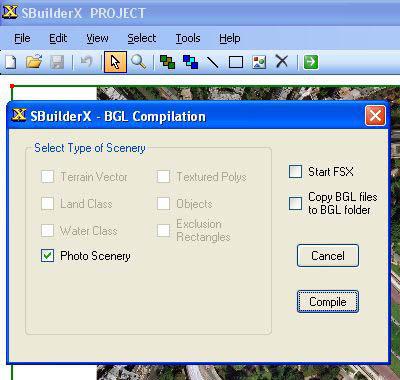
Compile as usual to get the bgl.
1. A quick and simple method - SBuilder X will take the images in the present workspace and automatically convert them into a custom ground bgl.
The SBuilder X workspace is 1792 x 1280 pixels in size and that will be the extent of the custom ground, although the resolution will depend on the zoom level of the background.
SBuilder X will also apply a simple blend mask that will blend the custom ground into the default textures along a thin band on the edge of the image.
To create custom ground textures by this method, right-click on the SBuilder X workspace:
Select the "Background ..." option to get this window:
You will have 2 options: either immediately compile the custom ground from the workspace, or save that workspace as a GeoTIFF image file;
By selecting "Compile", SBuilder X will launch the Microsoft Resample program and create the custom ground bgl:
Once your custom ground file has been created, you can change the name of the bgl to something more descriptive.
2. The second method for creating custom ground textures - you can select the precise area for which you want custom ground, SBuilder X will make it into a Map (with its own calibration text file), and that Map can be selected and compiled into a bgl. The Map can also be edited to correct colors, add transparent areas, or as a basis for creating blend masks and water masks.
First, you should zoom out so that the entire area of your choice is visible in the SBuilder X workspace. Then, go to the File-Add Map-From Background:
This will bring up a selection window:
You can draw a selection rectangle directly over the image to select the area desired, and also choose the zoom level you want.
Once you have done so, Builder X will create a Map of this size and with this coverage, and display it in the workspace instead of the Background image.
Any part of the selection for which there are no tiles will display in pure white (RGB values = 255,255,255) and will serve as a Null Value, that is, will be completely transparent and display the underlying terrain.
Be careful, as other parts of the image may also have pure white pixels, and they too would be completely transparent, so you may want to edit the Map in any image editing program first before compiling into custom ground.
If you right-click on the edge of the Map, you can bring up its Properties window:
Note that SBuilder X will give the Map a name that begins with "Photo". This is the name that will be given to the final bgl. You can change the name of the Map to anything that you wish, but it must start with "Photo" so that SBuilder X can recognize it as a source for custom ground. Once the bgl has been created, you can change its name.
If you decide to use the Map to create seasonal or night variants of the image, you can indicate them in the second tab of the Map Properties window:
To add blend masks or water masks to your custom ground, you can create them using the original image as a basis, and then save them with the same name, but using a suffix to indicate this. The files should be saved as TIF images, for example:
original image - L17X132735X132743Y90177Y90183.BMP
blend mask - L17X132735X132743Y90177Y90183_B.TIF
water mask - L17X132735X132743Y90177Y90183_W.TIF
Make sure that those files are in the SBuilderX\Tools\Work folder even if the original image is in another folder, and SBuilder X will automatically integrate the blend and/or water mask in the custom ground.
A word about Compression Quality: FS X allows for varying the compression of the final bgl. It has been determined that reducing the Compression Quality parameter from 100 to 85 will greatly reduce the size of the final bgl (up to a quarter of the original size) as well as the time needed to compile it. You can change the Compression Quality in the SBuilder.ini configuration file.
To create the custom ground bgl, simply select the Map (either by clicking on its edge, or by using the Select menu) and click on the BGL Compile icon (the green arrow) on the tool bar, which will bring up the Compile window:
Compile as usual to get the bgl.